A second blur filter vibrates weirdly

I followed this tutorial on how to filter a face:

(Basically you apply 3 filters: Mask: Simple Shape, Blur:Box, and then Mask: Apply). This worked fine.

I then copied and pasted the 3 filters using the “copy” and “paste” buttons in the filter area (next to the + and - icons to add and remove filters) to add a second blur effect elsewhere on the image. (So now there are 6 filters, Mask: Simple Shape, Blur:Box, Mask: Apply, Mask: Simple Shape, Blur:Box, Mask: Apply.) I adjusted the second set of parameters to where I wanted them on the image.

Upon export, the second blur effect vibrates and jumps around in place. I can’t think of any setting or explanation for this. I think the steps I listed above are sufficient to reproduce, otherwise I have also made a recording of myself performing these steps and can upload somewhere if necessary.

It seems to be a bug (which also easily reproduceable using the above steps). (Unless I misunderstand something and I am not supposed to add a second set of filters this way; however it seems to me I’m doing it correctly as other than this weird vibrating effect both of the blur effects are in the correct spot and they both function correctly, other than the second one vibrating in place.)

Multiple Mask: Apply is not supported. If you try to add it more than once through the filter chooser, it does not add and shows a message in the status area. However, you can circumvent it using Copy and Paste, I guess you could say this loophole is a bug, but I am not fixing it soon.

Oh, okay! I can’t really complain, it’s free software and kind of did what I wanted to.

For your information about how I exposed this bug, I wasn’t trying to circumvent anything, I was only exploring the buttons and saw there’s a copy and a paste button so it made sense to repeat the filters. (By the way I didn’t know there’s a status message area. Just now tried it using the + button rather than copy and paste and I saw what you’re talking about, but the message is shown in another part of the screen from where I’m looking, then disappears by itself after a moment. just FYI I didn’t notice it until you just called my attention to it since it’s my peripheral vision - if it were in the same part of the screen where I was looking, by the list of filters, I would probably notice it. That’s why I noticed the copy and paste buttons so easily, since they’re right under the filters and have good tooltips. if you wanted to keep the message in a different part of the screen, maybe the message could flash on/off for a few seconds until it disappears? or a small warning icon next to the message could flash a few times? I have quite a wide monitor and if it flashed it would definitely make me notice the status message before it disappeared.)

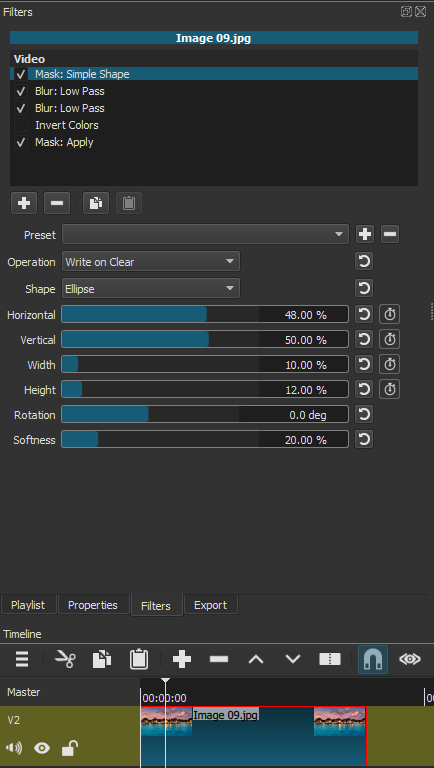
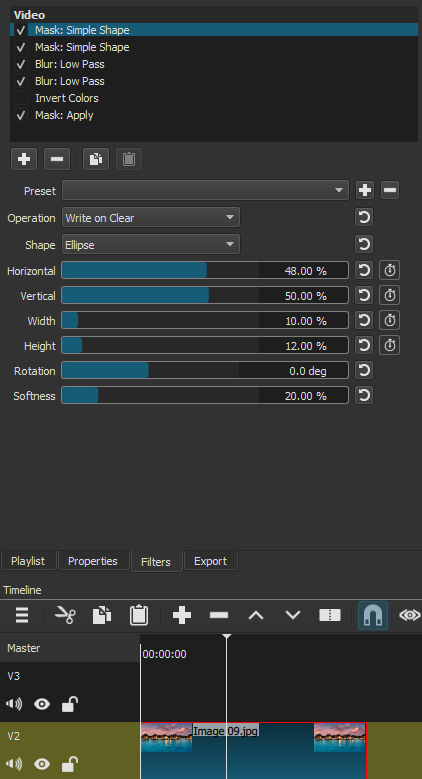
As for the second mask:apply, what really threw me off is that the path I took worked: it ended up with two blurs. In fact after failing to figure out why my second blur was vibrating, and remembering that I heard that shotcut is “buggy”, I decided to just live with the bug at the time, so I’ve already exported the video and already shared it. Since in my mind it made sense that the filters would be applied in order top to bottom (since you can rearrange them) and copying and pasting them had the effect that I wanted, I had no idea that I was suddenly in an unsupported path. I realized I was probably doing something wrong but I couldn’t figure out what.

Question: What is the correct way for me to add a second blur effect within the same part of the file?

In case this is “unsupported” I can suggest for posterity the workaround:

WORKAROUND TO ADDING A SECOND EFFECT:

  1. As only one “mask: apply” is supported at a time, to add a second blur, you must export your video in the final resolution you would like to export it, import the exported video into a new project as a new source file, add the new video to a new timeline, and there you can repeat the steps to apply the “Mask: Apply” a second time. (Since Shotcut will not realize the imported video already has effects added.) This effectively circumvents the developer restriction on adding a second “Mask: Apply.”

That’s what circumvention looks like to me :smiley: If there is no other way to do it, that’s OK, I’ll do it like that. If there is another way to add a second blur effect to a part of the video, please let me know and it could save a few steps.

For the moment please know that there is a video out there with a weird vibrating blur effect, because the user did not realize that copying and pasting a filter a second time was disallowed. :wink:

what’s the right way to add a second blur?

EDIT: And don’t get me wrong, I am very thankful for the software. Paid software like Adobe Premiere is very expensive by comparison.

If you are using the mask simple shape filter on a single video clip the mask should be the first filter. The blur(s) go below the mask filter. Then mask apply is used. The blur should be between mask and mask apply.

2 Likes

sauron, are you sure that with your instructions you are blurring two different parts of the image - such as applying one blur to one rectangle in one part of the image (such as one face), and at the same time a second blur to a second rectangle in a different part of the image (such as a second, different face), and with the rest of the image unblurred?

your screenshot you only show one “mask: simple shape” but that is the parameter which sets the location and size of the blur effect. (The blur effect itself doesn’t have a horizontal and vertical position which you can use to set its location on the screen, it’s the Mask: Simple Shape that has that. the blur:box effect just has a size and width which effects how the blur looks but not its location on screen.)

To try to follow your suggestion, I tried adding a second Mask: Simple Shape (so that the order of the filters is Mask: Simple Shape, Mask Simple Shape, Blur:Box, Mask: Apply) but that did not result in a second blur box.

Are you sure your instructions result in two different parts of the image blurred? (Such as blurring two different faces in two different parts of the image at the same time)? Did you test it?

if not, how can I blur two different parts of the image at the same time?

You need to apply two or more mask filters. The operation on the second mask filter should be set to subtract add.

EDIT
My bad. The operation as @shotcut said should be set to add.

3 Likes

Actually, Operation should be set to Add.

This works correctly for me now.

So the way to add a second filter is to have “mask:simple shape” repeated one after the other (with all of the ones after the first one set to “Operation: Add” rather than the default “Operation: Write on Clear”,) then the blurs repeated one after another, and then finally only a single Mask: Apply.

For me this meant:

  • Mask: Simple Shape (using the default, Operation: set to “Write on Clear”)
  • Mask: Simple Shape (“Operation:” set to “add”)
  • Blur: Box
  • Blur: Box
  • Mask: Apply

Thank you for the answers. The output file works correctly now, without any weird vibration.

Btw you should only need two blur filters if the first one was not strong enough at its max setting.

The multiple mask filters are used to combine shapes.

Oh OK. I saw that Sauron’s suggestion included two Blur: lines so that is why I tried to follow it. To be honest I don’t really understand conceptually what is going on (what mask means). I have a vague idea that is a kind of layer cut-out but that’s it.

(One other point of UX feedback is that I found it extremely difficult to see where in the image the mask actually is located when I add “Mask: simple shape”, since there is no outline in the preview, I just have to kind of find it visually based on its effect, which in the case of blur is pretty subtle and not visible in certain parts of the preview if there is a single solid color there. It is hard to see where I have set it to be located.)

1 Like

This topic was automatically closed 182 days after the last reply. New replies are no longer allowed.