I edited a video. I cut a piece with the CUT RECTANGLE filter, I used the keyframes. I saved the video. Now I can’t fix the video, it keeps moving and showing the black background, I tried using the filter pad, but it keeps moving the same way, I can’t resize it so that it takes up all the space and stops moving (not the video, but the edited area). What do I do?
Hi @WALDIR21
First we will make sure we talk about the right filter.
You are probably using the Portuguese (Brazil) language on Shotcut.
Cortar: Retângulo = Crop: Rectangle in English.
Did you press the Transparente button? This makes the black background transparent.
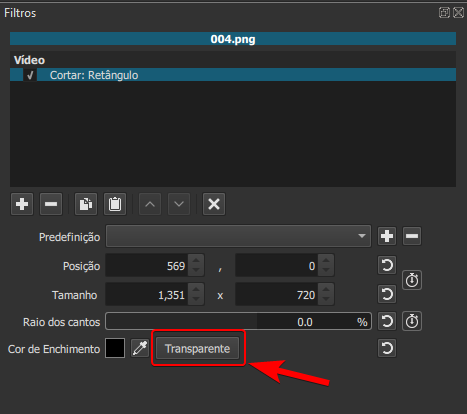
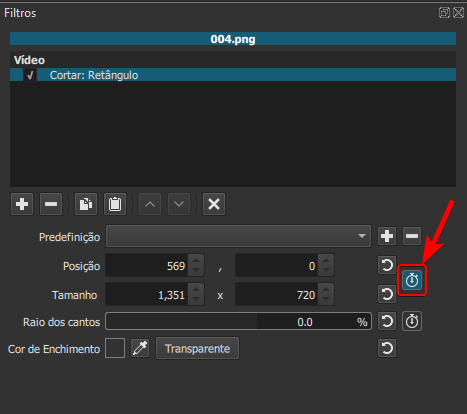
Maybe you applied Keyframes (Quadros-chave) to the clip by mistake?
I didn’t know about this feature with a transparent background, another lesson learned (in 50 years I will dominate the program, laughs). It wasn’t unintentionally that I activated the keyframe, it was on purpose, the selection of the piece to be cut didn’t stay still, I used the keyframe to follow the movement.
Ok, I realize now you mentioned using keyframes in your original post.
So what is exactly the problem when you say it keeps moving the same way?
I will try to describe the situation. The source video has a piece of the video that interests me. I cut it out with the CROP RECTANGULO filter, using the KEY FRAMES, because the object in question was in motion. I saved. Now when opening the video, in addition to being small, it is moving across the screen, it is not fixed. I’m trying to edit again, using magnification and keyframes again, pinning it to the edges of the edit area.
I think you applied the keyframes to the wrong filter 
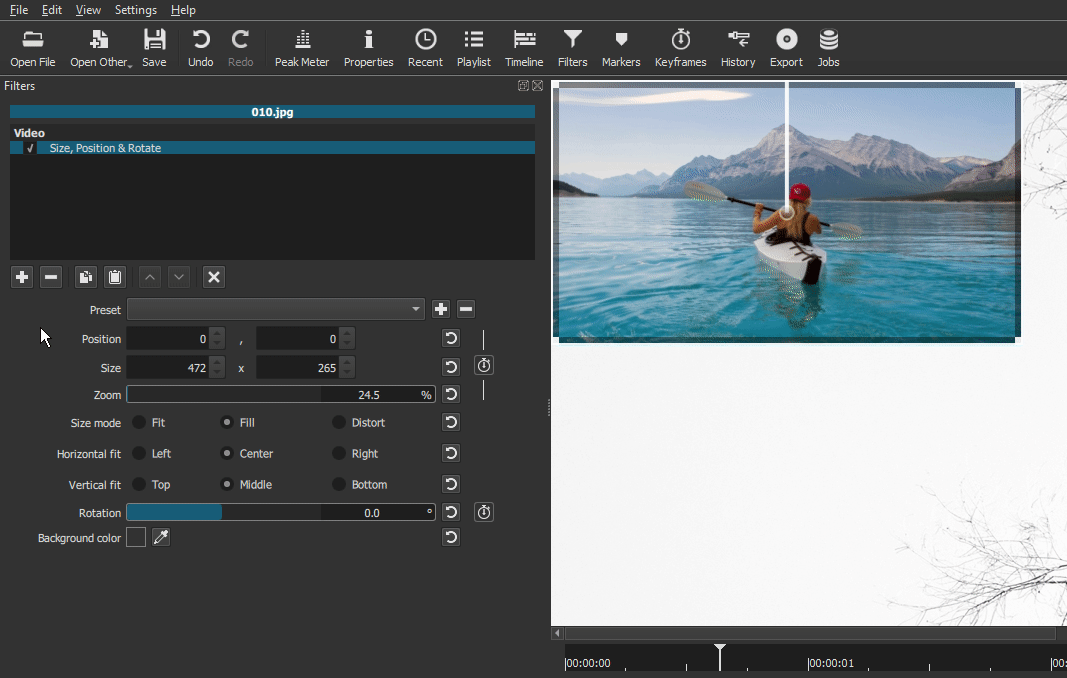
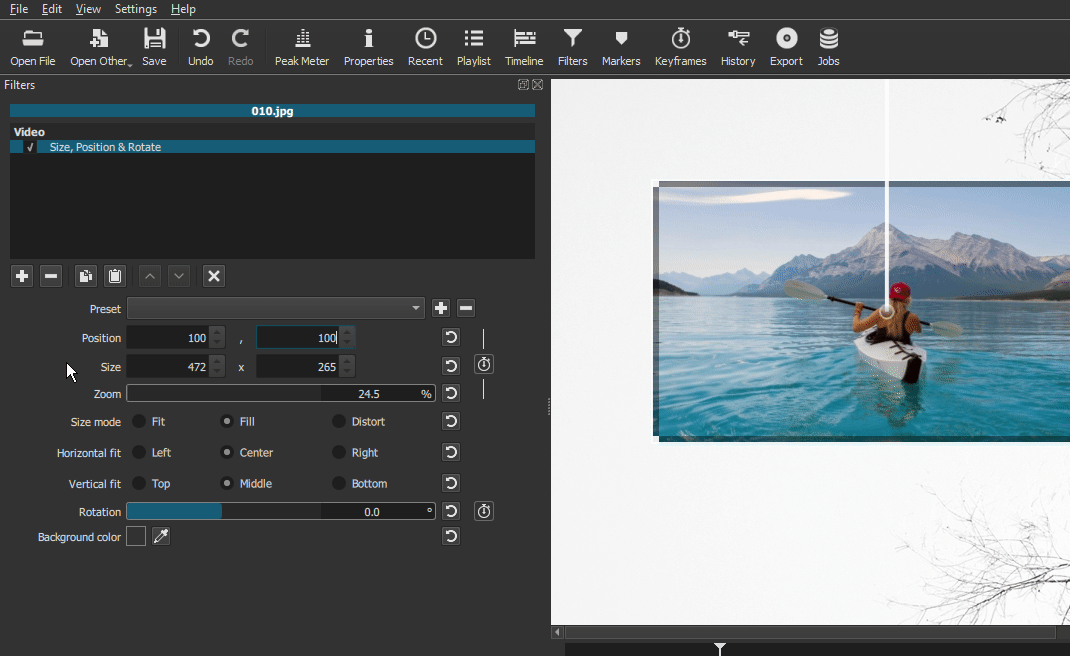
If I understand correctly, I think you should first isolate the object with the Crop: Rectangle filter, and then add a Size, Position & Rotate filter ON TOP of the Crop filter.
You then use keyframes on Size, Position & Rotate to keep the object in the cropped area.
I’ll try to make a video to illustrate what I mean
So here’s what I mean. I made this video as quickly as I could. So forgive if it’s not as nice as a proper tutorial.
Here’s what I did
- I used the Crop filter to isolate one of the cars
- I then added a Size, Position & Rotate filter and moved it above the Crop filter
- I added keyframes to the Size, Position & Rotate to keep the car in the cropped rectangle.
- I also added another Size, Position & Rotate filter UNDER the crop filter. That allows to move the rectangle (and the work I did with the first two filters) anywhere I want on the screen.
Understand. Do you mean that the KEYBOARDS only work on the filter that is at the top? Is it not necessary to mark keyframes for the effect to be applied? How can I resize the isolated “car” so that it occupies the entire length of the editing area and can be saved at 1080x920?
Yes, I applied Keyframes (not keyboards ) only to the filter at the top of the list.
But from what you just said, I think that you want to Export (as a video) only the cropped area ?
In that case, here’s what I’d do:
- Do all the steps I showed in the video
- Export the video as it is. By that I mean that if the original video is 1920x1080, export it at 1920x1080
- Start a new project and set the Video Mode at 1080x920 (Settings > Video Mode > Custom > Add)
- Import the 1920x1080 video you just exported in this project.
- Apply a Size, Position & Rotate filter and resize until the cropped part fits in the frame.
- Export the video
1 Like
Thank you.
Did it work? Is that what you needed?
1 Like
Yes, that’s right. I just need to put it into practice. What is happening? The video to be edited needs to be rotated first of all, when rotating it it already changes dimensions. I make the rectangle cut. I use the filter size, position and rotate, I already turn on the keyframe. It takes a while, because the object moves a lot, there are dozens of keyframe points (the video is 6 minutes long). I have to enlarge it to occupy the entire editing area. But when saving, the edited video doesn’t get “stuck” in the limits of the editing area, it goes up and down, disappearing and showing the black background.I restarted a new project with your tips, I’ll see if I get it right this time, I’ll let you know as soon as I finish, it takes a few hours.
It worked out. I did as you suggested. A discovery - a video of 6 seconds if we apply slow motion, turns into 20 seconds. One question - those numbers that are in the filter, POSITION, SIZE AND ROTATE, numbers that indicate POSITION, how to use them? Messing with the mouse is a huge job.
I personally use these number mainly for 2 reasons:
-
For example, suppose you need to position an object exactly at, say, 100 pixels from the left border and 100 pixels from the top border. Just enter 100 in the 2 position boxes. The one to the left is for horizontal movements, the one on the right for vertical movements.
-
After manually moving an object, you can finetune the position by putting your mouse cursor over the boxes and use the mouse wheel to move the object one pixel at the time.
How cool, one more lesson, VERY, VERY THANK YOU, thanks.
This topic was automatically closed after 90 days. New replies are no longer allowed.