I was able to create this, but it involves quite a lot of steps…
My project was set to 1920x 1080, at 30 fps.
Step 1
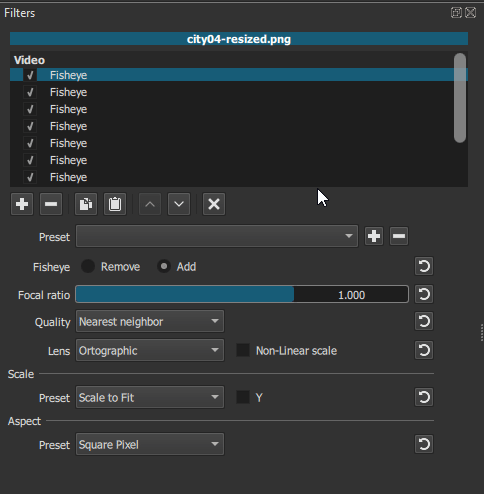
First, to turn the image into a sphere, I used the Fisheye filter with these settings:
| Setting |
Value |
| Fisheye : |
Add |
| Focal Ratio: |
1000 |
| Quality: |
Nearest neighbour |
| Lens: |
Orthographic |
| I left the other settings to default. |
|
Problem: One Fisheye filter is not enough to create a sphere.
Solution: I added identical copies of the filter until the image was turned into an almost perfect circle. I didn’t want to add too much copies, because each time you add one, you loose a little image quality and Shotcut get slower. So I ended up using 11 copies.
 .
.
Step 2
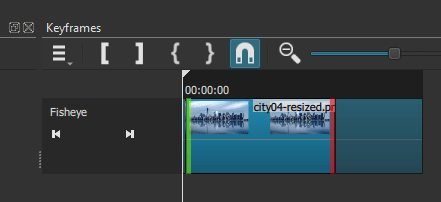
Now we need to gradually turn the rectangle image into a sphere.
Problem: You can’t add keyframes to the Fisheye filter.
Solution: Make each copy of the filter start being active at 2 frames intervals.
For that, I used Set Filter Start and Set Filter End in the Keyframes timeline.
Note: For the sake of reusability, don’t do the steps below in your main project. Create a separate Shotcut project, add ONE track, import an image to that track and add the 11 Fisheye filters.
Steps:
- Move the Playhead to the FIRST frame of the clip
- Move the Playhead ahead 2 frames.
- Select the 1st Fisheye filter in the filters list.
- Press the Set Filter Start button in the keyframes timeline.
So for the first 2 frames of the clip, the image is still rectangular, and when the Playhead gets to the third frame, the first Fisheye filter kicks in.
- Move the Playhead ahead 2 frames.
- Select the 2nd Fisheye filter in the filters list.
- Press the Set Filter Start button.
- Move the Playhead ahead 2 frames.
- Select the 3th Fisheye filter in the filters list.
- Press the Set Filter Start button.
- Repeat the last 3 steps for each of the remaining filters in the list.
- Move the playhead ahead for 1 second.
- Select the LAST filter in the list.
- Press the Set Filter End button.
- Move the Playhead ahead 2 frames.
- Select the filter ABOVE.
- Press the Set Filter End button.
- Repeat the last 3 steps for each of the remaining filters in the list.
Step 3
Now we want to save this project as a template. This will allow you to recreate this effect without having to go trough all these steps again.
Go to File > Save As…, choose an easy to find location, and give the project a name like:
spherize-image_TEMPLATE.mlt for example.
Step 4
Export with transparency.
- Go to the Export tab.
- Choose Quicktime Animation in the Presets list.
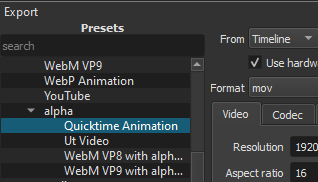
- Press the Export button.
Now you can go back to your main project, import the MOV video you just exported, and use filters to resize it, position it, and, animate it if you want to (with keyframes).
Everything except the image will be transparent.
I hope these instruction are clear enough (I have doubts). I realize this is complicated, but so far it is the only way I found to create this effect. Feel free to ask questions if you need to.
EDIT: If you find that the animation is a bit choppy when the rectangle turns into a circle (and back to the rectangle), you can improve it by using 1-frame intervals instead of 2. The animation will not last as long though. You could compensate by using more than 11 filters (if your computer can handle it)
