I understand that changing the UI would probably mean to rewrite a big part of the Time Remap filter. I’d also prefer a simpler, more intuitive interface, consistent with the other filters, but if it’s impossible I can live with that.
The main issue I have right now with the filter is the guessing it takes to slow down or speed up a part of a video. Sorry in advance for the long description and all the images. This is meant for all to understand my point, not only the long term Shotcut users.
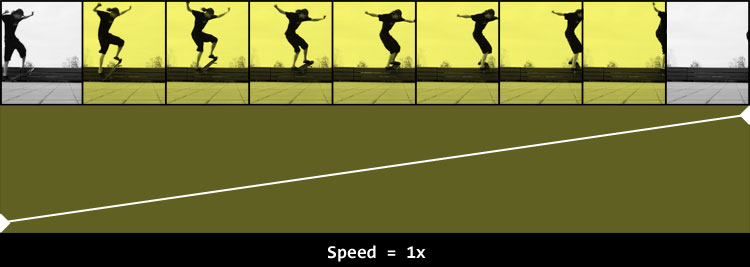
In the clip shown above, suppose I need to slow down the yellowed part.
The intuitive thing to do is:
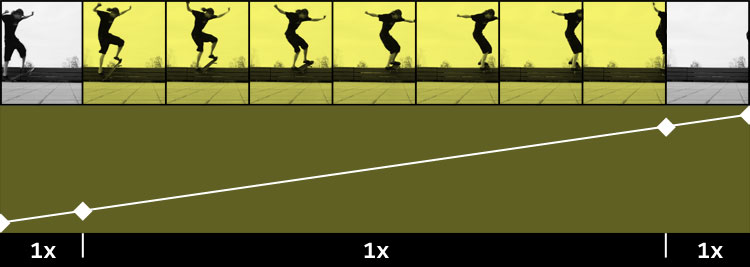
Add a keyframe at the position where I want the slowing down to begin, and add another one at the position where I want the video to go back to normal speed.
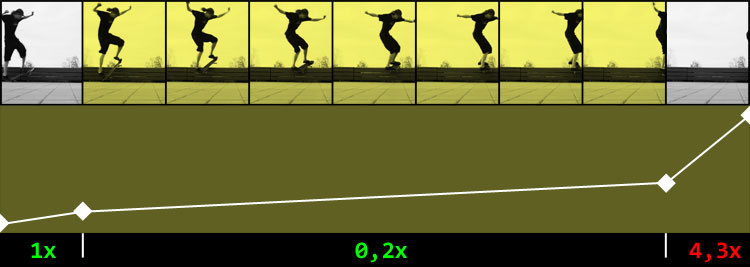
Since doing this changed the speed in the second and the third segments, select the keyframe #3 to set it back to 0,2x then select keyframe #4 to set it back to 1x.
By the way, this is the method I figured out to speed up or slow down a clip. If any of you know of a better and more accurate way of setting the keyframes, please share it.
Some may argue that the solution is to add keyframe #3 further down the timeline in the first place. But that’s still a wild guess. No guarantee it will hit the right spot on the first attempt.
Ideally, the Time Remap filter should be the one taking care of all the guessing. We tell it at what frame we want to start a speed change and at what frame we want it to stop and it does the math to make sure we get what we ask for
How about the concept that Final Cut Pro uses that I mentioned above here for speed ramping? I don’t know how that would work with keyframes with curves but I could see such a similar thing being implemented in the filters that have keyframes with no curves (e.g. Size, Position & Rotate). What do you think?
By the way, why is this thread being closed in 12 days? With so much conversation here from members asking questions about the filter and how to understand it and maybe improve it can that time limit be cancelled?
All this rethinking of keyframe placement to match what we have learned about the anchoring of that keyframe with a chosen frame (and that this would not vary by further adjustments to the speed ramp) is what makes this filter complicated to implement quickly.
We can use tricks to handle this so that we control this better, but they involve additional steps.
I am speaking without testing this but I imagine the following:
I want speed x1.0 from frame 0 to frame 200 and then speed x 0.5 from frame 201 to frame 300. Finally I want normal speed from frame 301 to frame 500.
For me it is simpler, extract 3 subclips (0-200, 201-300, 301-500) and apply the filter individually to each subclip. They are not influenced by each other. The speed change would start and end at the frames I chose.
For this example, it could be done like this.
The idea was to incorporate the inverse speed also, in the example but I didn’t want to complicate so much.
So for that case, we don’t have negative velocity.
Additionally, maybe the interpolation between frames with Time Remap is better because we can choose between approximation or fusion mode.
Automation. I just found a category setting to turn off: “Don’t close until the last post in the topic is at least this old.” I do not know if that is old or new. In any case, I turned on for all categories with auto-closure. It is not retroactive, but I will manually remove the automatic closure for this thread.
For your example, after step #1, I would suggest
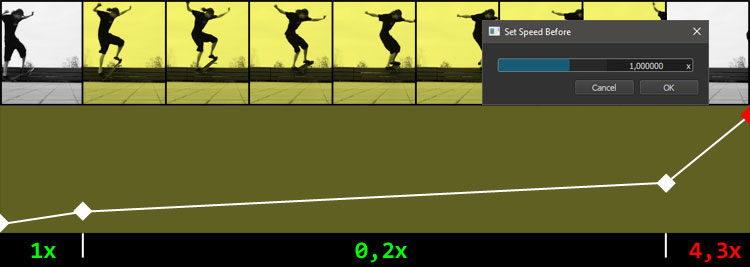
2) Hold Alt and click on keyframe #3. This will lock the keyframe on the input frame you originally selected it to end on (y axis) and will only change the output time (x axis)
3) Drag the keyframe to the right until the “speed” status in the filter pan shows your target speed of 0.2
I would also question the premise of your workflow. How do you know that 0.2 is the right speed? I expect the creative process to use some iteration. Try one speed, play it, and then try another. The click+drag suggestion I made makes it easy to keep dragging right until the speed “feels” right.
That example is for speed ramping - which this filter does not provide. But besides that, it is a great demo. But that level of integration would not be done using the current keyframe display. I think it would have to be a whole new UI feature as others have suggested already.
I already know about Alt + drag and also Ctrl + drag
Speed is not the issue here. I have no problem slowing a video at any speed.
The issue is how to end the slow motion (or a speed up) at a precise moment, on the first attempt.
As an example, in the video below, let’s suppose I want to slow down that clip (no matter at what speed) like this:
At the moment the stick hits the cue ball : Speed drops from 1x to 0,2x (or whatever speed you want)
At the precise moment the cue ball hits the first ball at the end of the table : Speed goes back to 1x.
No problem for #1 the speed will drop where you add the keyframe.
But where will you put the other keyframe to make sure, on your first try, the video goes back to normal speed at the precise moment the cue ball hit the other ball ?
I know it’s for speed ramping but speed ramping is essentially an effect of bezier curves and bezier curves is used in keyframes in general regardless of what the effect is. You said that it’s a bad thing to implement bezier curves because it would complicate the code. So I was wondering if that method in Final Cut for speed ramping which is a linear control (rather than a keyframe graph) of the smooth transition between the two keyframe points could be similarly replicated in Shotcut for keyframes without curves and not have it be as complicated as you say bezier curves would be?
Great point, @MusicalBox and this is one of the things I had in mind that I wanted to talk about when @Austin brought rippling up yesterday. I was planning on doing it later but here we are.
There’s no way to do what you are asking for in the current way that Time Remap is designed. It would have to implement a way to dynamically change the length of the clip according to the slow down you are setting so that there is enough duration in the rest of the clip to go back to 1x speed. Right now the length of the clip stays put regardless of what speed changes you made in the clip.
Could that be implemented, @brian? Because really that’s the biggest issue with Time Remap. Basically, because the length of the clip stays stuck there is no way to ever pick what speed you want for another section. You’re always limited by the duration of what’s left. I really wish I wasn’t so busy when the Time Remap test versions were being published because this was the biggest issue I had but I kept expressing it the wrong way to you since I had a bunch of other things going on that was keeping me occupied. If this can be done then most of this will start to make sense.
I do not see that as a huge limitation. I would expect the workflow to be:
Make the clip really long using the properties panel. Not sure how long to make it? No problem. Just make it huge.
With the speed still at 1.0, watch through the clip and create keyframes at points of interest where you expect to want to change the speed
Working left to right, slide keyframes to the left (to speed up) or to the right (to slow down) to create the effect you are looking for. Be sure to hold the Alt key when sliding keyframes to maintain the input frame of interest for each on. (I understand how ripple would be nice here)
Repeat step 3 until you are satisfied
Trim the end of the clip back by dragging it from right to left to where you want the end of the clip to be
I had watched tutorial from other tools where people used this exact same sequence and it seems reasonable to me.
Well, right now you can’t use Time Remap on a clip that has that the speed changed in the Properties tab. So is that an adjustment you’re thinking of making?
But are you saying that there is no way to to make it that Time Remap itself changes the length of the the clip accordingly? That would be ideal.
EDIT:
I misread what you wrote. But the problem with your workaround is that it’ll still be very difficult to match it to the next clip’s frame so that the two follow each other seamlessly. It’s fine if the clip that Time Remap is applied to is not connected to the next clip. But if it is supposed to be part of the same shot or scene then it’s a problem. That’s where dynamically changing the length of the clip would come in and solve that issue because the speed can be set back to 1x very easily. Can that be implemented?
If it was just a matter of sliding the keyframe left or right to get to the right moment in the video it wouldn’t be that bad.
But each time you move a keyframe, the speeds you’ve set on the connected segments changes. And you need to reset them to check if you moved the keyframe to the right spot.
Before moving the keyframe:
First segment : 1x
Second segment : 0.5x
Third segment : 1x
After moving the keyframe:
First segment : 1x
Second segment : 0.35859x
Third segment : 1.37333x
After my last post I tried to slow the cue ball as I described in the post.
It took me 6 attempts to get the end keyframe on the right spot. And each time I had to reset the speeds after moving the keyframe.
Yes. That’s another issue I’ve seen a couple of times when trying the filter in a project.
After splitting a part of a clip and convert it to a sub-clip, I added the time remap and the connection with the clip that follows wasn’t seamless. There was some frames missing. I had to change the speed of the sub-clip in properties instead.
One other thing I forgot to mention is that this workaround doesn’t work in a use case like @MusicalBox’s clip. He wants to work with the entire 10 second clip so there is no more footage to pull from to make it longer. Because Time Remap isn’t making the clip longer as he is slowing down that section after the stick hits the cue ball he can never get it to go to 1x after the exact frame of when the ball makes contact with the other ball at the end of the table.
By the way, @brian, I want to make clear that I really do appreciate all the hard work you’ve been putting in for this feature and the other aspects of Shotcut you’ve worked on. I hope my comments come across as constructive as I do mean well for the work you’re doing.
That clip wasn’t the best example to be honest.
But it’s the best one I could quickly find that show two easily identifiable moments. In that case, the stick hitting the cue ball, then the cue ball hitting the other ball. I wish I had found a longer clip.