

The Mask: Simple Shape filter is one of the most versatile tools in your Shotcut toolkit. Think of it as a way to “cut out” a specific part of your video to apply changes only to that area. While other filters might select parts of a video based on color (like a Green Screen), this filter selects based on geometry, using shapes like squares or circles to define your workspace.
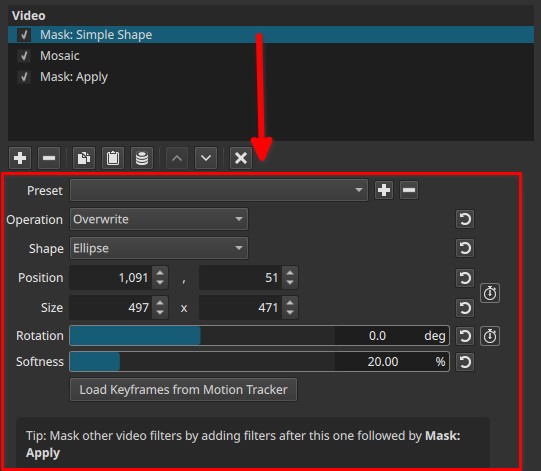
When you apply this filter, you are essentially telling Shotcut: “Only focus on what is inside this window.”
How You Control the Shape
Once you select the filter, you can customize your “window” using these settings:
- Shape: Pick the best fit for your subject—Rectangle, Ellipse, Triangle, or Diamond.
- Position & Size: Use the Horizontal/Vertical and Width/Height sliders to place the mask exactly where you need it.
- Rotation: Tilt the shape to align with angled objects, like a computer screen or a tilted horizon.
- Softness: This is the secret to professional edits. It blurs the edges of your shape so the effect blends naturally into the rest of the video rather than looking like a harsh cutout.
Practical Ways to Use It
- Privacy: Place a soft-edged circle over a face or a license plate to hide sensitive information.
- Selective Editing: Want to make the sky bluer without affecting the grass? Use a rectangle mask on the top half of your frame.
- Spotlighting: Brighten a person in a dark room by placing an ellipse over them and increasing the exposure.
- Split Screens: Use a rectangle mask to “crop” a clip so you can show two different videos side-by-side.
The “Sandwich Logic” Workflow
In Shotcut, simply creating a mask isn’t enough; you have to tell the software how to handle the effects inside that shape. The most reliable method is the Sandwich Logic. You build your filter stack in three layers, just like a sandwich.
1. The Top Bun: Mask: Simple Shape
This is always your first filter. It defines the “where.”
- What to expect: When you add this, the area outside your shape will usually turn black. Don’t worry—this means it’s working! You have successfully “cut out” your shape from the rest of the footage.
2. The Filling: Your Creative Effects
Any filter you place directly below the mask is the “filling.” These are the changes that will appear only inside your shape.
- Popular Fillings: You might add a Blur to hide a face, a LUT for color grading, or Brightness to create a spotlight.
- Pro Tip: Add an Opacity filter here. It acts as a master “strength” slider for all your other fillings.
3. The Bottom Bun: Mask: Apply
This is the most important step that many editors forget. You must add the Mask: Apply filter at the very end of your list.
- What it does: This “seals” the sandwich. It tells Shotcut to stop applying effects to the shape and to bring back the rest of your original video. The black background will disappear, and your effects will now be perfectly contained within your shape.
Your Filter Stack Cheat Sheet
To make sure your mask works every time, your Filters Panel should follow this exact order:
| Order | Filter Name | The Goal |
|---|---|---|
| 1 | Mask: Simple Shape | Define the area (The Window) |
| 2 | Any Effect (e.g., Blur) | The visual change (The Filling) |
| 3 | Any Effect (e.g., Color) | Additional changes |
| 4 | Mask: Apply | Seal the mask (The Bottom Bun) |
Why follow this? Without the “Bottom Bun” (Mask: Apply), your video will often be stuck with a black box around your effect. This workflow prevents that error and gives you professional, selective control over your edits.